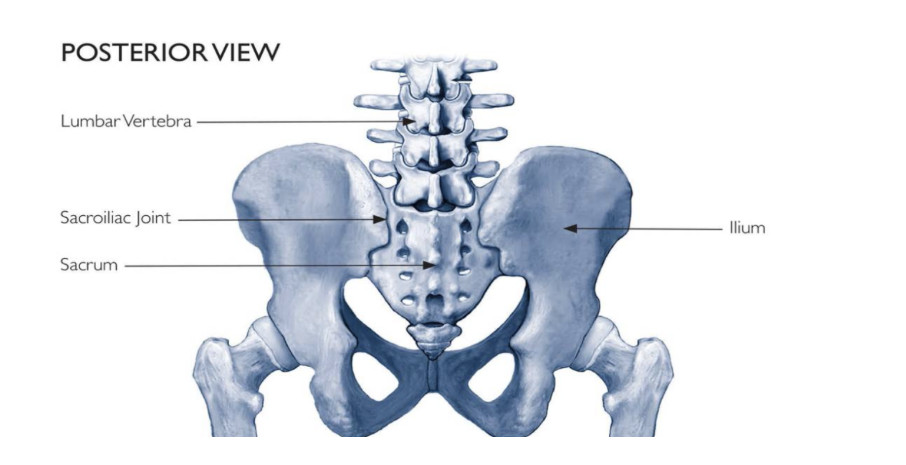
Lumbar spine related pain is frequently misdiagnosed as SI joint pain due to their proximity and the location of symptoms. It can be difficult to distinguish which structures are actually the problem compared to which region of the body you feel the pain. We’ll dive more into this in just a moment. Other common diagnoses of low back pain based on imaging are disc bulges, disc herniations, degenerative disc disease, facet arthropathy, and several others.
It’s important to note, as we have previously discussed in prior blogs, that many individuals experiencing no pain at all will have these findings on imaging. Unless you have a fracture, tumor/cancer, infection, or an acute disc herniation that is causing radiating pain down your leg, the most accurate and common diagnosis is “non-specific low back pain” meaning no serious structural cause is identified. It doesn’t mean there aren’t any structures contributing to your pain, it means it’s hard to accurately pinpoint a particular structure and there could be multiple structures involved.
This is good news! It rules out the more serious causes of low back pain and opens the door to safe and effective treatment through progressive rehab.
Sacroiliac (SI) Joint Pain vs. Lumbar Spine Pain
- These tests do not replace a full exam by a healthcare professional
- A “positive” test doesn’t mean you definitely have an SI joint problem. It just gives us more information
- Stop immediately if:
Pain feels sharp, burning, or shoots down the leg
You feel dizzy, faint, or just unwell
- If you have known fractures, osteoporosis, recent surgery, pregnancy complications, or severe pain, skip these and talk to your provider first
1. Distraction (SI Gapping) Test
Goal: Gently stretch the front of the pelvis to see if it reproduces familiar pain around the SI joint (back of the pelvis)
You’ll need: A firm surface to lie on (floor, firm bed, or therapy table)
Steps:
1. Lie on your back with knees straight and legs relaxed
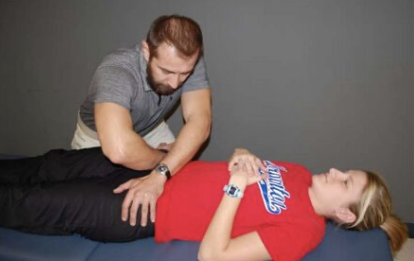
2. Have your partner cross their forearms and place their hands on the front of your hip bones (the bony bumps at the front of your pelvis, just below your belt line)
3. Move the hands slightly outward so the palms are resting on the flat part of those bones, one hand on each side
4. Gently press the hands outward, as if they’re trying to push your hip bones away from each other
Keep the pressure slow and controlled
5. Notice what you feel:
Mild pressure or stretch in the front of the hips is normal
If this clearly reproduces your familiar pain around one or both SI joints, this is considered a positive test.
2. Thigh Thrust Test
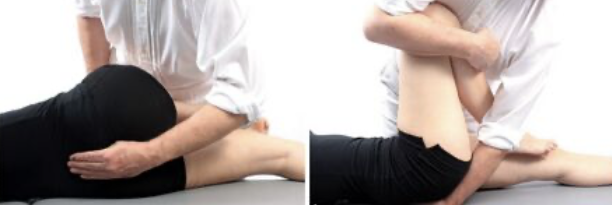
You’ll need: A firm surface and maybe a small pillow for your head
Steps for right sided SI joint pain:
1. Lie on your back
2. The right hip is flexed (bent) to 90 degrees: knee is pointing up and lower leg is relaxed
Keep your left leg relaxed and straight on the surface
3. Have your partner sit or stand on your left side
4. Have your partner place their left hand underneath your sacrum (the triangular bone at the base of your spine) to hold it steady
5. Have your partner place their right hand on top of your knee
6. Have your partner apply a downward force through your thigh bone, as if they are trying to push your thigh straight down through the floor or table
Apply 3-5 thrusts with a moderate amount of force
7. Notice what you feel:
Mild pressure or stretch in the hip or upper thigh is normal
8. Repeat the same steps on the opposite side
If this clearly reproduces your familiar pain around one or both SI joints, this is considered a positive test.
3. SI Compression Test
Goal: Gently squeeze the pelvis together to see if that pressure recreates familiar pain
You’ll need: A firm surface to lie on and maybe a small pillow for your head
Steps for right sided SI joint pain:
1. Lie on your left side, with your right side up (right side facing the ceiling)
You can bend your hips and knee slightly
Put a pillow under your head for comfort
2. The right side is the side you will test first
3. Have your partner place heel of their hand on the bony part of the upper hip (the crest)
4. Have your partner gently press straight down toward the floor, like they’re to smush the two sides of your pelvis together
Apply 3-5 thrusts with a moderate amount of force
5. Notice what you feel:
Mild pressure or discomfort at the side of your hip where their hand is pressing is normal
6. Roll to the other side and repeat the same steps on the opposite side
If this clearly reproduces your familiar pain around one or both SI joints, this is considered a positive test.
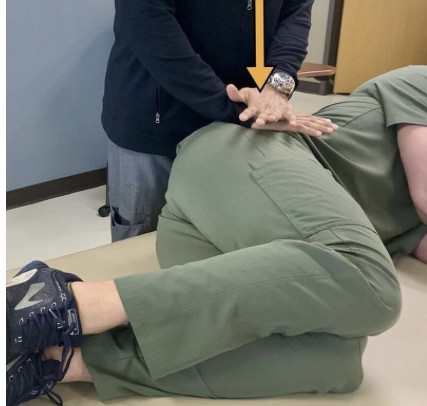
4. Sacral Thrust Test
Goal: Gently apply pressure to the sacrum (the triangular bone at the base of your spine) to see if it recreates familiar pain
You’ll need: A firm surface and maybe a folded towel under your chest/hips for comfort
Steps for right sided SI joint pain:
1. Lie on your stomach on a firm surface
2. Have your partner off to your side and find your sacrum:
It’s the flat, triangular bone just below your lumbar spine and above your tailbone
They might feel it as a flatter “plate” in the middle, between your hip bones
3. Have your partner place make a loose fist or stack their hands on top of each other and place them gently over the middle of your sacrum
4. Have your partner slowly lean their body weight onto their hands to gently press straight down toward the floor
They should use a mild to moderate amount of force, not a hard shove
Apply 3-5 thrusts
Do your best to keep your glutes and legs relaxed
5. Notice what you feel:
Gentle pressure in the low back is normal
If lying on your stomach is uncomfortable or causes other symptoms (breathing difficulty, dizziness, etc.), skip this test
If this clearly reproduces your familiar pain around one or both SI joints, this is considered a positive test.
What It Means If 2+ Tests Are Positive
If 2 or more tests are positive, there’s a good chance the SI joint is the pain generator. If fewer than 2 are positive, it’s very unlikely to be SI joint related pain.
**Please note: As with any test, there are limitations. The accuracy of the test is dependent on the proficiency of the person performing it.
Ready to Finally Understand What’s Driving Your Back Pain?
Book a free Discovery Call here and get a personalized plan, expert guidance, and clear next steps. You don’t have to guess your way through back pain alone.

Dr. Cameron Whitehead
Contact Me